

Overview
ELM Enterprise Manager 7.5 includes the features necessary to migrate an ELM Server from one Windows server to another without any interruption or loss of data. This seamless transition is possible thanks to the flexibility of ELM Agents being able send data to more than one ELM Server.
During the Migration process, ELM Agents continue to send data to their current ELM Server. From the current ELM Server, the Agents are then configured to send in parallel the event and performance data to a newly installed ELM Server. The original ELM Server is then decommissioned leaving the new installation.
On the new server ELM will install SQLLocalDB by default. If you plan to use a different version of SQL such as Express or a full version, be sure to install that before installing ELM.
In the step by step instructions we refer to two UIs – the MMC based ELM Console and the new ELM Management Console.
Steps
Current ELM Server
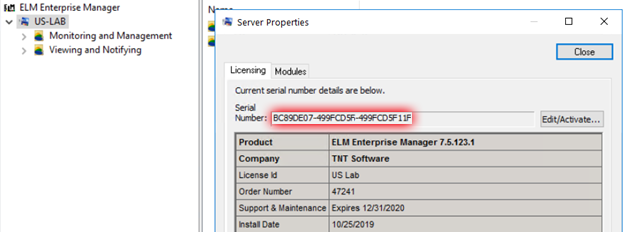
- Note the current ELM Server’s build version and license number found in the ELM Console (MMC) for use on the new server. Right-click the ELM Server name, select Properties, Licensing tab.
- Request a temporary license key from TNT Software sales or support. Then update and activate the current ELM Server with this temporary license.
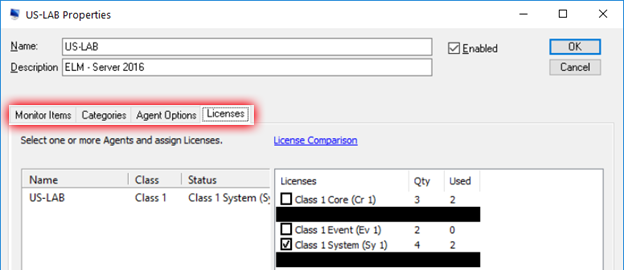
- If an Agent is installed on the current ELM Server (typical), right-click the Agent from the ELM Console, select Properties, and make note of the settings under of each of the tabs: Monitoring Items, Categories, Agent Options and Licenses. These will be used to create an identical Agent on the new ELM Server.
- Launch the ELM Management Console (new UI). Right-click on the ELM Server name in the Explorer panel tree and select Edit. Scroll down near the bottom and find Agent Trust Servers. Click the + icon and add the IP address of the new ELM Server.

- On the current ELM Server navigate to the ELM Program directory (typically Program Files(x86) > ELM Enterprise Manager) and copy the eemsvr.dat file to a location accessible by the new ELM server
On the New Server
- Install the same version of ELM as the current ELM Server (noted in Step 1) and activate with your current/active license number from the original ELM server. Configure the database(s) from the ELM Management Console (new UI) by selecting Menu > Server > Database Wizard.
- Stop the ELM Enterprise Manager service and the ELM Management service.
- Navigate to the ELM program directory and rename the file eemsvr.dat to eemsvr.old.
- Copy the eemsvr.dat file from step 5 and place it in the new server’s ELM program directory.
- Start the ELM Services from Step 2 on the New Server.
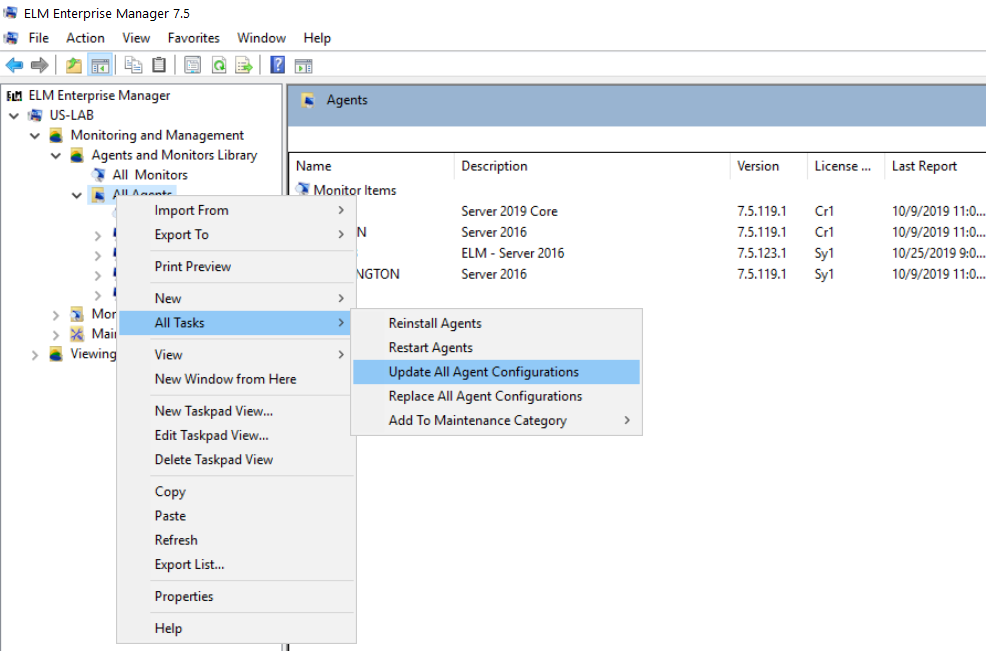
- Launch the ELM Console (MMC). Right-click on All Agents > All Tasks > Update Agent Configuration.
- If not already completed during ELM installation, deploy an agent to the new ELM Server machine and configure with the settings, license, and monitoring categories noted from Step 3.
Agents should now be reporting to the new ELM server. Verify everything is working on the new server and then you are clear to uninstall ELM from the old server.